How to Optimize WordPress Images and Convert Them to WebP or AVIF
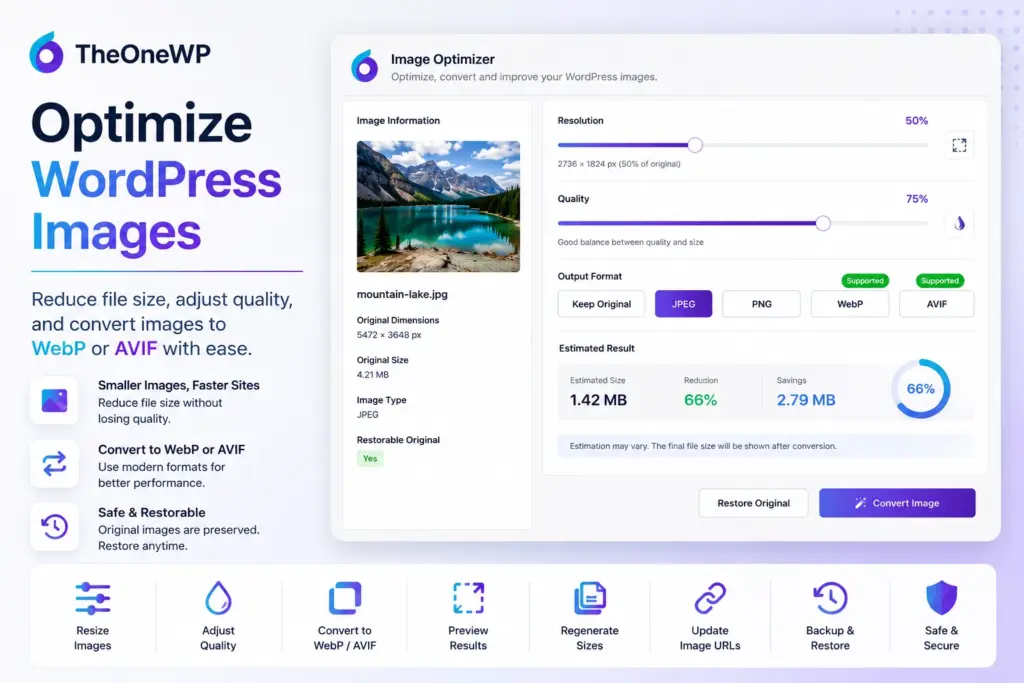
WordPress image optimizer tools help administrators reduce file sizes, resize oversized uploads, convert images to modern formats, and improve media performance directly from the WordPress dashboard. TheOneWP includes an Image Optimizer module that lets you adjust image resolution, control compression quality, convert files to JPEG, PNG, WebP, or AVIF, preview the estimated result, and restore the original image whenever necessary.
Unlike destructive WordPress image compression tools, TheOneWP does not overwrite the original source. Instead, it creates a separate optimized version, updates the WordPress attachment metadata, regenerates the related responsive image sizes, and updates existing references to the new file. Therefore, administrators can optimize WordPress images while keeping a recovery path available.
Why Use a WordPress Image Optimizer?
Images often represent a significant portion of a web page’s total transferred data. A single uncompressed photograph can weigh several megabytes, even when the website displays it at a much smaller size.
Large image files can create several problems:
- Longer page-loading times.
- Higher bandwidth consumption.
- Slower loading on mobile connections.
- Unnecessary storage usage.
- More work for browsers when decoding oversized images.
- A less responsive experience for visitors.
WordPress already creates multiple image sizes when users upload files to the Media Library. However, the original upload may still use an inefficient format, excessive dimensions, or a higher quality level than the website needs.
A WordPress image optimizer gives administrators direct control over resolution, compression, and output format. As a result, WordPress image optimization can reduce unnecessary file weight while preserving an appropriate balance between visual quality and performance.
TheOneWP provides this functionality as an optional module inside its collection of modular WordPress tools. You can activate the Image Optimizer when you need it without installing another single-purpose plugin.
WordPress Image Optimizer Features in TheOneWP
The Image Optimizer works directly with supported image attachments inside the WordPress Media Library. It provides controls for resolution, image quality, output format, estimated file size, restoration, and WordPress attachment metadata.
The module supports the following source image types:
- JPEG.
- PNG.
- GIF.
- WebP.
- AVIF.
Available output formats depend on the image capabilities provided by the server’s PHP GD installation. JPEG and PNG remain available by default, while WebP and AVIF appear only when the server supports their corresponding GD functions.
Access the WordPress Image Optimizer from the Media Library
Once activated, the module adds an Optimize action to supported images in the WordPress Media Library.
Administrators can open the WordPress image optimizer from:
- The Media Library list view.
- The Media Library grid view.
- The individual attachment edit screen.
The optimizer opens in a modal, so users can review and change the image without navigating through a separate configuration page.
Review the Current Image Information
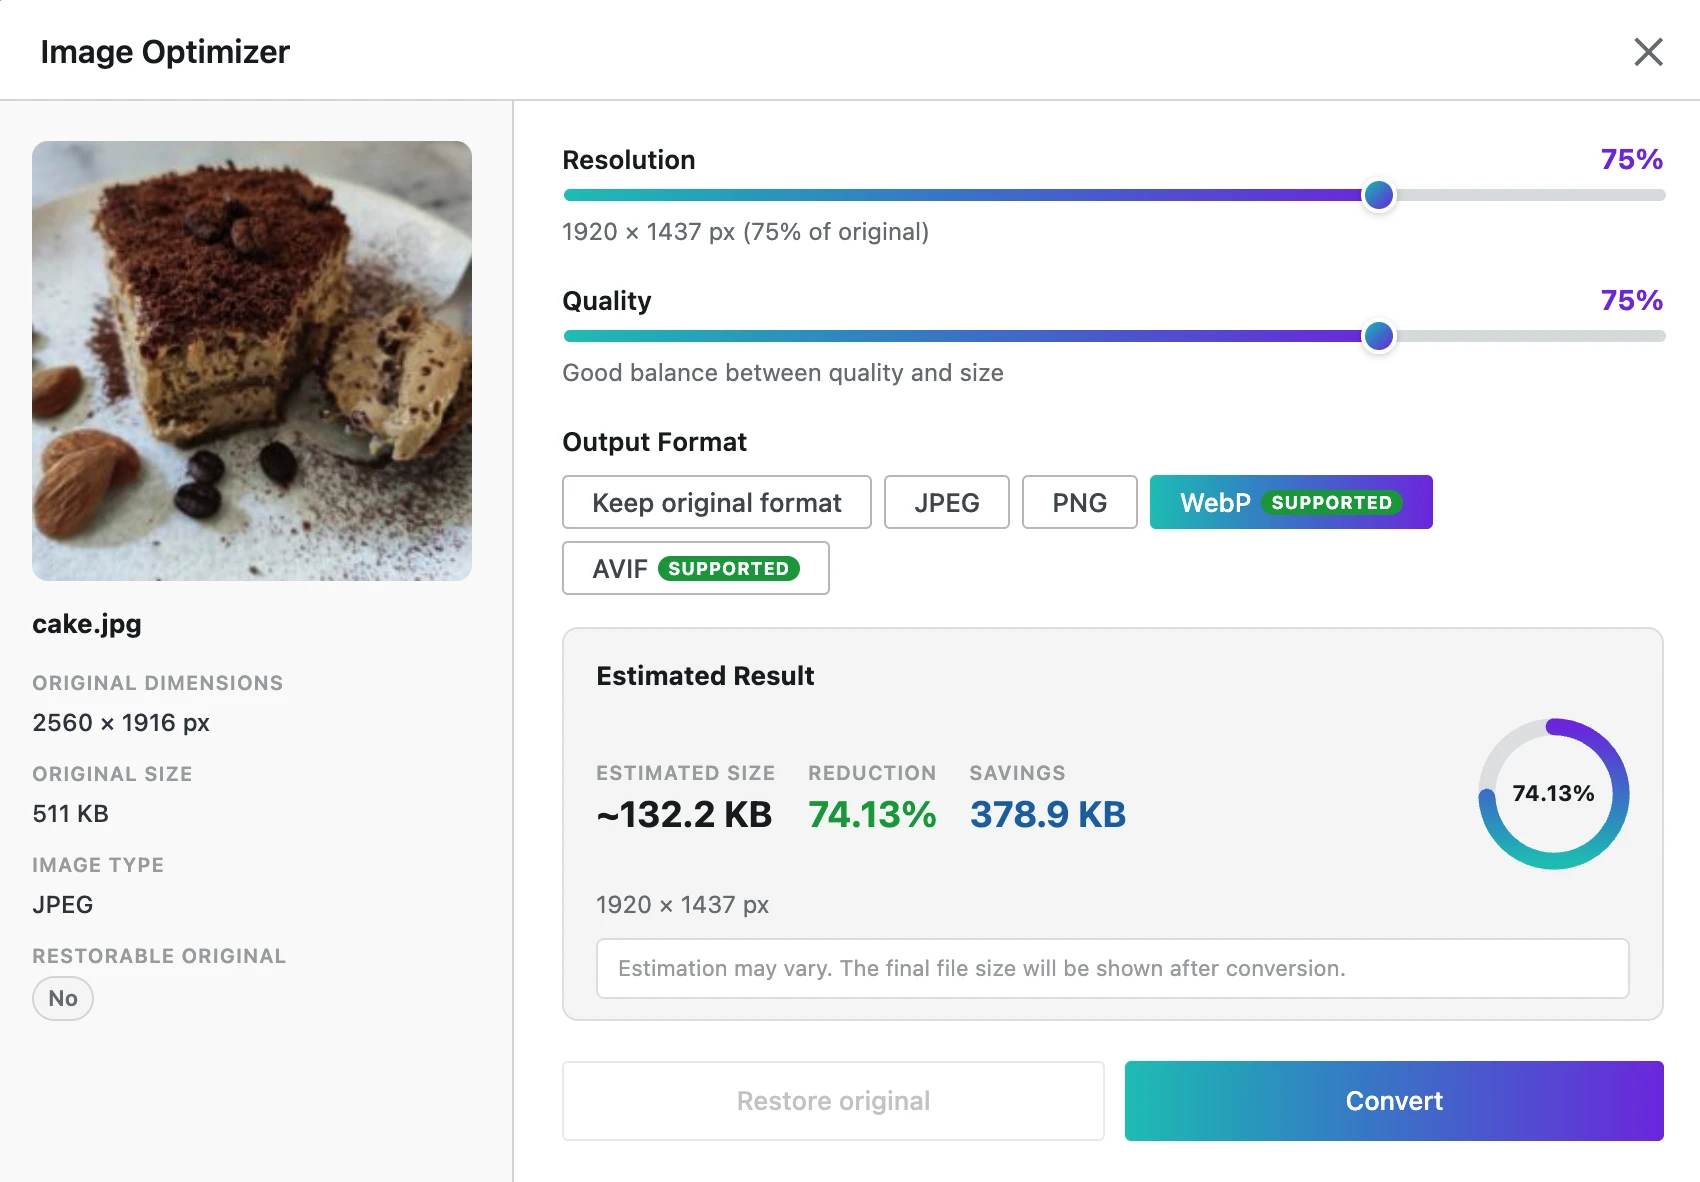
Before starting the WordPress image optimization process, the modal displays practical information about the selected attachment, including:
- The current filename.
- The source image dimensions.
- The original file size.
- The current image type.
- Whether a restorable original version exists.
The module uses the highest-quality source available when it calculates and creates the optimized result. If WordPress previously generated a scaled version of a large upload, TheOneWP can use the untouched full-resolution original as the compression source.
Resize Images with the WordPress Image Optimizer
Uploading an image with dimensions of 6000 × 4000 pixels rarely makes sense when the website displays it at 1600 pixels wide. The browser may still need to download and decode much more image data than the design requires.
TheOneWP lets administrators optimize WordPress images with a resolution slider that scales the source image from 1% to 100% of its original dimensions.
For example, reducing a 4000 × 3000 pixel image to 50% creates a target resolution of approximately:
- 2000 pixels wide.
- 1500 pixels high.
The WordPress image optimizer preserves the source aspect ratio when it resizes the main image. Therefore, reducing the resolution does not stretch or distort the image.
Preview the Estimated Resolution
As the administrator changes the resolution slider, the modal immediately displays the expected output dimensions. This makes it easier to choose an appropriate image size before generating the optimized file.
The resolution estimate does not require the module to write a temporary file to the server. Instead, it calculates the target dimensions from the source image and selected percentage.
Control WordPress Image Compression Quality
Resolution controls the number of pixels in an image, while quality controls how aggressively the selected format compresses its visual data. TheOneWP provides a WordPress image compression slider ranging from 1 to 100.
A higher value generally preserves more detail but produces a larger file. Conversely, a lower value usually creates a smaller file but may introduce visible compression artifacts.
The quality setting directly affects formats such as:
- JPEG.
- WebP.
- AVIF.
PNG uses its own lossless compression process. Therefore, the quality slider does not behave in the same way for PNG files as it does for lossy formats.
Choose a Practical Image Quality Level
There is no universal WordPress image compression value that works for every file. Photographs, screenshots, illustrations, gradients, and images containing text all react differently to compression.
As a practical starting point:
- Use higher quality for detailed photography and portfolio images.
- Use moderate quality for blog images and general editorial content.
- Inspect screenshots carefully because text and interface elements can reveal compression artifacts quickly.
- Compare both visual quality and estimated size before converting the image.
The goal is not to produce the smallest possible file at any cost. Instead, effective WordPress image optimization removes data that visitors cannot meaningfully perceive while preserving the image’s purpose.
Convert WordPress Images to WebP or AVIF
TheOneWP can preserve the original image format or convert the attachment to another supported format.
The available output options include:
- Keep the original format.
- JPEG.
- PNG.
- WebP, when supported by the server.
- AVIF, when supported by the server.
Convert WordPress Images to JPEG
JPEG remains a practical choice for photographs and complex images that do not require transparency. It provides broad compatibility and adjustable lossy compression.
Convert WordPress Images to PNG
PNG works well for images that require transparency, sharp interface details, diagrams, or lossless reproduction. However, photographic PNG files can become considerably larger than equivalent JPEG, WebP, or AVIF files.
Convert WordPress Images to WebP
WebP can provide smaller files than traditional JPEG and PNG formats while maintaining strong visual quality. It also supports transparency, which makes it suitable for both photographs and graphical assets.
TheOneWP lets administrators convert WordPress images to WebP directly from the Media Library, provided that the server’s PHP GD installation includes WebP encoding support.
Convert WordPress Images to AVIF
AVIF can achieve efficient compression at high visual quality, particularly for photographic content. However, encoding can require more server resources, and the server must provide AVIF support through PHP GD.
When the required server functions are available, administrators can convert WordPress images to AVIF using the same visual workflow provided for the other formats.
The module checks server capabilities before presenting WebP and AVIF as output choices. Therefore, administrators do not see conversion options that the current environment cannot generate.
For technical information about server image support, consult the official PHP GD documentation.
Estimate the Optimized Image Size Before Conversion
Reducing image dimensions or quality without seeing the expected result would force administrators to rely on guesswork. The WordPress image optimizer avoids that problem by calculating an estimated file size before conversion.
Whenever the user changes the resolution, quality, or output format, the module:
- Calculates the target resolution.
- Compresses an image sample in memory.
- Measures the resulting byte size.
- Displays the estimated output size.
- Shows the expected percentage reduction or increase.
The module performs this WordPress image compression estimate without writing the result to disk. In addition, it waits briefly while the user adjusts the controls, preventing unnecessary server requests for every small slider movement.
Understand File Size Increases
Not every conversion creates a smaller file. For example, converting a compressed JPEG photograph to PNG can increase its size substantially. Likewise, selecting maximum quality may produce a larger result than the current file.
The estimate highlights both reductions and increases. Consequently, administrators can reconsider unsuitable WordPress image optimization settings before modifying the attachment.
Preserve and Restore the Original WordPress Image
TheOneWP does not overwrite the original image during optimization. Instead, the WordPress image optimizer creates a separate optimized file with an _opt suffix.
For example:
product-photo.jpgcan becomeproduct-photo_opt.webp.header-image.pngcan becomeheader-image_opt.avif.
The original image remains available on the server. During the first optimization, the module also saves a snapshot of the original WordPress attachment metadata.
This approach provides several advantages:
- The source image remains untouched.
- Repeated optimization starts from the highest-quality source.
- Changing the output format does not repeatedly compress the previous optimized file.
- Administrators can restore the attachment to its previous state.
Re-Optimize Without Quality Stacking
Repeatedly compressing an already compressed image can gradually reduce its quality. TheOneWP avoids this problem by reading the untouched original source whenever the administrator optimizes the attachment again.
Therefore, changing an image from JPEG to WebP and later using the WordPress image optimizer to convert it to AVIF does not require the module to use the previous WebP file as its source.
Restore the Original WordPress Image
When a backup state exists, the modal enables the Restore original button. Restoring an image:
- Removes the optimized main file.
- Removes optimized image-size variants.
- Reconnects the attachment to its original file.
- Restores the original MIME type.
- Restores or regenerates the original attachment metadata.
- Reverts stored optimized URLs to their original versions.
As a result, administrators can test different WordPress image compression and conversion settings without making the first change irreversible.
Regenerate WordPress Responsive Image Sizes
WordPress does not use only the main image file. When users upload an image, the platform usually generates several additional sizes for thumbnails, content layouts, themes, plugins, and responsive srcset output.
TheOneWP updates these image variants during WordPress image optimization instead of changing only the main attachment.
The module:
- Reads the image sizes already registered in the attachment metadata.
- Uses the highest-quality original source.
- Regenerates each size in the selected output format.
- Preserves the expected width and height for every registered size.
- Uses centered cover cropping when a size requires a different aspect ratio.
- Updates the filename, MIME type, dimensions, and file size in the attachment metadata.
Generating each variant from the original source helps avoid the quality loss that could occur if the module recompressed an already reduced WordPress thumbnail.
For more information about how WordPress handles responsive image sources, see the official documentation for wp_calculate_image_srcset().
Update WordPress Image URLs After Conversion
Changing an image format also changes its filename and URL. A simple tool that converts WordPress images to WebP or AVIF could therefore leave old references inside posts, page-builder data, widgets, theme settings, and serialized options.
TheOneWP updates relevant references after the WordPress image optimizer creates the new files.
The URL replacement system covers:
- Post content.
- Post excerpts.
- Supported post metadata.
- Serialized metadata values.
- WordPress options.
- JSON-escaped URLs.
- HTTP and HTTPS variations.
- Generated image-size URLs.
The module treats the main attachment URL differently from individual image-size URLs to preserve compatibility with systems that store an attachment ID and retrieve the correct size dynamically.
This helps the optimized attachment continue working with:
- Gutenberg image blocks.
- The classic editor.
- Theme-generated attachment images.
- Page builders that store image references in post metadata.
- Widgets and theme settings stored in WordPress options.
The modal also reports how many database locations the WordPress image optimization process updated after conversion or restoration.
Prevent Cached WordPress Images from Remaining Visible
Browsers, page caches, and content delivery systems may continue serving an older image after the attachment changes. This can make a successful WordPress image compression or format conversion appear ineffective because the visitor still sees the cached file.
TheOneWP assigns a new version value after every optimization and restoration. It then adds that value to image URLs where WordPress renders the attachment.
The module applies versioned URLs to:
- Gutenberg image blocks.
- Classic editor image markup.
- Attachment URLs returned by WordPress functions.
- Programmatically generated image sources.
- Responsive
srcsetentries.
This cache-busting process encourages browsers and caching layers to request the updated image instead of reusing an outdated response.
What Happens When You Optimize an Animated GIF?
The WordPress image optimizer accepts GIF files as source images. However, PHP GD loads only a static frame and does not preserve the complete animation during conversion.
For this reason, TheOneWP displays a warning whenever the selected source is a GIF. Optimizing the file will flatten the animation into a static image.
Before processing an animated GIF, consider whether the animation is essential. When it is, use a workflow specifically designed for animated image or video optimization instead of converting it through a static WordPress image compression process.
WordPress Image Optimizer Server Requirements
The Image Optimizer uses PHP GD to load, resize, compress, and encode images. Therefore, the server must provide the required GD functions for the source and output formats.
The basic requirements include:
- A working PHP GD installation.
- JPEG and PNG support.
- WebP support to convert WordPress images to WebP.
- AVIF support to convert WordPress images to AVIF.
- Sufficient PHP memory for large image processing.
- Write permissions inside the WordPress uploads directory.
The module raises the WordPress image-processing memory limit before loading an image. Nevertheless, extremely large files may still exceed the resources available on limited hosting plans.
If WebP or AVIF does not appear in the format selector, the most likely reason is that the server’s GD build does not support that encoder.
WordPress Image Optimizer Security Controls
WordPress image optimization modifies attachment files, metadata, and database references. Consequently, TheOneWP limits access and validates each request before processing it.
Administrator-Only Access
The WordPress image optimizer requires the manage_options capability. In a standard WordPress installation, this restricts optimization and restoration actions to administrators.
WordPress Nonce Verification
The module verifies a WordPress nonce before processing image information, estimates, optimization requests, and restoration requests. This helps protect the AJAX actions from cross-site request forgery.
Attachment Validation
TheOneWP confirms that the requested item is a valid attachment and that its source file exists before starting the WordPress image compression process.
Supported MIME Type Validation
The optimizer accepts only supported image MIME types. Furthermore, it verifies that the requested output format is available on the current server.
Uploads Directory Validation
During restoration, the module validates that the requested image path remains inside the WordPress uploads directory. This prevents the restore process from operating on an unrelated server path.
How to Use the WordPress Image Optimizer in TheOneWP
You can optimize WordPress images directly from the Media Library.
Step 1: Enable the Image Optimizer Module
First, open TheOneWP from the WordPress admin sidebar and navigate to the section containing the Image Optimizer module. Then activate its main toggle and save the settings.
Step 2: Open the WordPress Media Library
Next, go to Media in WordPress. You can use either the list view or the grid view.
Step 3: Select Optimize
Find a supported image and click Optimize. Alternatively, open the attachment edit screen and use the WordPress image optimizer action available there.
Step 4: Choose the Resolution
Use the resolution slider to reduce the image dimensions. The estimated output resolution updates immediately.
Step 5: Adjust the Compression Quality
Set the WordPress image compression quality according to the image type and intended use. Review the estimated file size before continuing.
Step 6: Select the Output Format
Keep the original format or choose JPEG, PNG, WebP, or AVIF. The available choices depend on the server capabilities.
Step 7: Review the Estimate
Check the estimated resolution, output size, and percentage difference. If the result becomes larger than the source, reconsider the selected format or quality.
Step 8: Convert the Image
Click Convert. TheOneWP creates the optimized main file, regenerates the attachment sizes, updates WordPress metadata, replaces relevant URLs, and refreshes cached image references.
Step 9: Restore When Necessary
If the result does not suit the website, reopen the WordPress image optimizer and click Restore original. The module removes the optimized files and reconnects WordPress to the original attachment state.
Common WordPress Image Optimizer Use Cases
The module supports several common WordPress image optimization workflows:
- Editorial websites — reduce large photographs before publishing articles.
- E-commerce stores — optimize product images while preserving responsive sizes.
- Portfolio websites — balance visual detail with faster loading.
- Agency projects — correct oversized client uploads without leaving WordPress.
- Landing pages — convert WordPress images to WebP or AVIF.
- Blog migrations — update inefficient legacy images individually.
- Mobile-focused websites — reduce image dimensions and transferred data.
- Storage cleanup — create smaller active image variants while retaining restorable originals.
WordPress Image Optimization Best Practices
WordPress image optimization works best when it follows the actual design requirements of the website. Before converting images, consider the following practices:
- Do not upload dimensions that greatly exceed the largest displayed size.
- Use JPEG, WebP, or AVIF for photographic content.
- Use PNG when transparency or lossless graphical detail genuinely matters.
- Check visual quality instead of relying only on file size.
- Review screenshots and text-heavy graphics carefully after compression.
- Keep the original image available until you confirm the optimized result.
- Test AVIF and WebP support on the production server.
- Avoid processing animated GIFs when the animation must remain intact.
- Clear page caches after major media changes when the caching system does not purge automatically.
- Test important image changes on staging before updating a high-traffic production page.
A smaller image is useful only when it still performs its visual job. Turning a product photograph into a blurred archaeological artifact may improve the byte count, but it does little for the product.
Why Use the TheOneWP WordPress Image Optimizer?
Standalone WordPress image compression plugins can provide resizing, conversion, or optimization features. However, each additional plugin introduces another dependency, update process, interface, and potential compatibility surface.
TheOneWP includes Image Optimizer as one independently controlled module alongside tools for media management, file uploads, SEO, security, content administration, database maintenance, and WordPress customization.
Furthermore, the WordPress image optimizer does not depend on a remote compression service. It processes supported images through the server’s PHP GD installation, so the files remain within the WordPress environment.
Users can activate the module when they need to optimize WordPress images and disable it when the workflow no longer requires it.
Final Thoughts on the WordPress Image Optimizer
A WordPress image optimizer should provide more than a single compression button. Administrators need control over dimensions, quality, output format, responsive image sizes, existing references, cache behavior, and restoration.
TheOneWP Image Optimizer lets administrators resize images, adjust WordPress image compression quality, convert WordPress images to WebP or AVIF, preview estimated file sizes, regenerate responsive variants, update stored URLs, preserve the original source, and restore previous attachment data.
Most importantly, the module creates optimized copies instead of destructively replacing the original image. Therefore, users can improve WordPress media performance while retaining control over the source file and its previous configuration.
The result is a practical WordPress image optimization workflow built directly into the Media Library, without requiring another dashboard, external compression service, or standalone plugin.